Monday, June 29, 2009

Lighting and Portrait Challenge Setup

I thought that yesterday's Lighting and Portrait Challenge image could do with a bit of splainin'. I believe that any problem can be solved with the addition of more gear. Kidding! Although there was a bit more to making this image than it might seem at first. Once I decided that I wanted to do my self portrait in the car, I had to figure out how to get all my gear in there and secured. Turns out I never totally figured out the secure thing, but that's for later. I also needed a way to remotely trigger the camera since I would be driving and couldn't reach the shutter button.

First, the tripod. No big deal really, just spread the legs around a bit to find the most stable position. I wasn't rock solid, but held up just fine. Next, the flash. I needed it to be on the dash in order to cover my face the way I wanted. No problem. A liberal application of duct tape should be sufficient right? You know the one thing I've found that duct tape won't stick to? The dashboard of my Maxima. Yep, once I got rolling, the first turn I made sent the flash shooting off the dash and into my lap. Of course seeing that the duct tape wasn't working, what do you think I tried next? You got it, more duct tape. I'm a slow learner. I did manage to get it to stick long enough to get the shot, but I'm still not exactly sure how.

Ok, now I need a remote trigger. Seems to me, I've been down this road before. The DSLR Remote software from onOne would be perfect. Oh wait, that needs a wifi network to work though, and I'm gonna be driving around. But wait! (WARNING: technical jargon ahead) I can create and Ad Hoc network on my laptop and connect my iPhone to that! This made it kinda like using bluetooth *cough, new feature would be nice, cough* and it worked like a charm. The only thing I really wished for was a larger button for firing the shutter so I didn't have to look down at the phone so much.

So I've gotta have my laptop in the car to run the DSLR remote server software so I might as well have the images auto-import into Lightroom right? I mean, what self respecting photographer wouldn't want that? I figured all this fancy computin' stuff's gonna run my battery down quick, so I dug around and found a power inverter that plugs into the cigarette lighter and powered my laptop.

Whew, that's a lotta stuff. Oh, almost forgot. I wanted the light coming from my flash to be fairly focused so I needed a way to shape it into a narrow beam. There are different ways of doing this, but I decided to use a snoot. A wha? A snoot is like a tube that you put on the head of your flash to concentrate the light. You can buy one of these, but I decided to go the DIY route and make my own. (Thanks old AppleTV box!) With a bit of cutting and folding, and the aforementioned duct tape, I had a snoot. This would be a great place for a picture of it, but I don't have one so we'll move on.

Once I got all this set up in the car, I needed to dial in my settings. I got the focus and framing set from behind the camera, and then did everything else from the drivers seat. I needed to get the flash position and power set first. Once I had the flash in position, I started taking pictures and adjusting the flash power until I had the light on my face that I was looking for. I ended up at 1/64 power on the flash and an Aperture of f/10 on the camera. At this point, it was just a matter of dialing down my shutter speed until I had as much on the ambient light as I wanted. In this case, 0.8 sec. It was so awesome to be able to do all the Aperture and Shutter adjustments from my phone with the onOne software. Saved me a lot of running around. This is what those settings looked like sitting in my driveway.

Photobucket

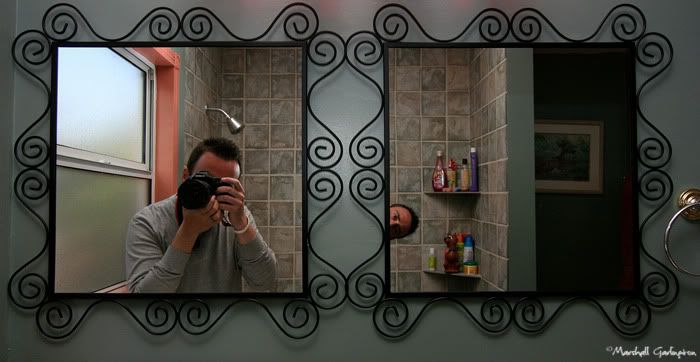
After that I just drove around and took shots when I thought there would be something cool passing by outside. Oh, another tip. If you're going to try something like this, make sure your flash is NOT set to go to sleep every couple of minutes. Um, yeah. Alright, here's the all important setup shot to give you an better idea of where everything was.

Photobucket


I hope this gives you a better sense of what went into this shoot and maybe sparked some ideas of your own. Until next time, keep shooting!

Lighting and Portrait Challenge

Well, today's the day. Last Monday I posted that Boybarian Dad and I had decided to have a little self-portrait showdown to flex our creative muscles. I, of course, carefully planned out what I wanted to do and got it done with lots of time to spare. Oh, wait a minute, no I didn't. I waited 'til the last minute and winged it. The parameters we set were; self-portrait, at night, single flash, city in the background. Here's my take.

Photobucket

Yes I'm in a car. Yes I'm driving. But hey, a self-portrait, at night, one flash and yes, that's city in the background, even if it's blurry.

Check out Boybarian Dad's shot here.

If any of you joined in on this, leave a link to your shot in the comments.

For all the details on how I took this shot, check back tomorrow. They'll be words and pictures about my picture!

Thursday, June 25, 2009

Pretty cool!

Chase Jarvis was running a contest to see who could take the best mobile phone picture. The prize was his "old" iPhone 3G. There were 3500 entries and he announced the winner today. No, I didn't win, but I did get in the top 100, which he posted on his blog. Click here to see my entry. Do yourself a favor and check out the other entries too, because there's some uber creative people out there.

Tuesday, June 23, 2009

Try something new

Ok, this post is gonna be part tutorial, part motivational speech. I want to explain how I shot a long exposure star trail image, but I also want to use it as an example of the broader idea of pushing yourself and not waiting until things are "just right" to try something. Let's get to it.

I went to visit my family in Louisiana last week. My 96 year old grandmother was/is in the hospital with a broken hip, and while things seem fine now, you just never know what could happen when someone gets up in age. I wanted to make sure I could see her. She's very special. I know that's a bit heavy, but I wanted to say why I was there and hey, it's my blog.

Let's start by defining what a star trial image is. Star trails are streaks that form when you have a long exposure and the rotation of the earth makes the stars appear to move through or rotate around the image. Didn't know there was gonna be some planetary science in here, did ya? Basically, your camera's on the earth, and the earth's spinning. Leave the shutter open long enough, and things seem to move. I tried this last year when I was up in Yosemite.


This was a single, one hour exposure. This also happened to be the first time I had ever tried a shot like this. I was so happy with this one, that the next night I went out to try again. I'd show you that one, but you could basically get the same effect if you closed your eyes. Nothin'. I had everything set exactly the same as the night before, but I forgot one little detail; make sure to press the shutter button. Yep, waited around in the dark for an hour only to find that the camera had just been sitting there, waiting for me to fire it. Sigh.

What equipment are you going to need for this type of shot?

- Camera with manual settings. This is probably going to have to be some type of DSLR. My Canon G9 has manual settings, but it won't let me take exposures longer than 30 seconds. With this technique your exposure is going to be more in the 45 minute to one hour range.
- A moderately wide angle lens. Since this effect is best apprecaited if you can see a lot of the sky, a lens with a focal length of 35mm or wider is best.
- A tripod. A rock solid platform for your camera is essential. Any camera movement during the exposure will cause your star trails to be jagged or incosistent. Not the look we're going for here.
- A remote shutter release or some other means of keeping the shutter open for the exposure.
- Anti-boredom equipment. This is a long time to sit around watching your camera on a tripod, so bring something to occupy your time. Maybe music to listen to, or a book to read in your car. Or if you're like me in Yosemite, a remote flash to set up in bathroom stalls and take "surreal" images with your point and shoot. And by "surreal", I mean images that I would look at later and wonder what I was thinking when I took them.

Fast forward to last weekend. My parents house, where I did most of my growing up, is located in a very, shall we say, rural area. It's not the middle of nowhere, but you can see it from the hill behind their house. I hadn't really thought about doing any star trail images until it got dark at their house and I realized that it was a new moon. New moon, meaning the moon was not out, not the book from the Twilight lady.

I'm at my parents house. It's DARK. I've got my big camera, but no tripod. My dad walks into the house and magically reappears with a tripod, so I got that covered. The only thing I'm lacking now is some type of remote cable to hold the shutter open for the 45 minutes to an hour that I need. I had purchased just such a cable for my old camera, but Canon, in it's infinite wisdom, did not make that cable compatible will all of its' cameras. What to do? Improvise! I needed something to act like my finger pressing the shutter button down for about an hour. What's around the house? A rubber band would work as tension. Now I just needed something to press against the button. My mom scrounged around and found a pencil eraser. The size was perfect and the rubber band could pull on it with sufficient force.

Did I say it was hot? And humid? It's about 10:30 p.m., mid 80's and 200% humidity. Kinda like wearing a warm, wet blanket when you're outside. This will be important later. I got outside and found a likely spot in their yard. I wanted to include some trees in the foreground just to give it some depth. Tripod set, camera on manual, shutter set to Bulb, aperture is f/4, iso 200, focus set to Infinity (no, really) in manual. You don't need to worry about depth of field for this setup, so f/4 is fine. All you're worried about being in focus here are the stars, and at umpteen light years away, you're good.

Time to set my highly sophisticated shutter release. I tripped the shutter three times while I was trying to get it set, but on the fourth one it stayed down. I stayed for a couple of minutes to make sure it was holding, then went back inside to wait. I came out an hour later to find that my eraser had given it's all in the name of photography and had been shot off the camera, never to found again. Remember the humidity? That plus the slickness of my shutter button had been too much for the slippery eraser. I check the lcd on the back of the camera and found that I gotten roughly five minutes of very shaky star trails. I must have been bumping it around too much when I was trying to get the eraser set, and that accounted for the shakiness. Three lifetime attempts at star trails and only one success. It's a good thing that first one went so well!

The next night I decided to step things up a bit with a new rubber band (ok, my first one broke) and a watch battery! The battery was my dad's idea, and it turned out to be perfect. Same settings, new place in the yard, 45 minutes.


Not the most spectacular image, but the effect is what I hoped for. Of course, all this does is make me want to try another one! The first thing I want to show is that, if you want to try a technique like this, you don't need a lot of fancy gear. Most of you probably have DSLR's already, so what you need is a dark night with a clear view of the sky, and some type of remote release. And, as I've shown here, that can be almost anything.

The second, and most important thing I want to emphasize is, get out there and try something new. Maybe the first time won't be great, or maybe it will. If it's not great, you'll learn a lot. If it is great, you'll be stoked to try it again or push it further. Whether you want to try star trails, off camera flash, macro, portraits, high key, low key, combos of these, whatever. Try it. I've done tutorials on panoramas, water drops, taking a self portrait, post processing here and here, and all of my Fix-It Friday posts link to a small Photoshop/Lightroom tutorial. You can try one of these or find others on the web. The point is, step outside of your comfort zone and shoot something you haven't shot before. Learn something you didn't know about Photoshop. All it's gonna cost you is time, and the more you invest in your photography, the better your images will get.

Thus endeth the lesson.

Monday, June 22, 2009

iPhone #3

The next in my ongoing, yet somewhat infrequent series of iPhone images.


Many thanks to Mike Wong from onOne software and Imaging Insider for mentioning my water drop tutorial on their sites yesterday. Click here to read Mike's post. Click here and scroll down for Imaging Insider. Look at me, I'm on the internets!

Sunday, June 21, 2009

Lighting and Portrait Challenge

I've been a fan of Boybarian Dad's blog for a while. Recently he and I starting chatting back and forth about photography and pushing ourselves creatively. Well, one thing led to another and we decided to set an assignment for ourselves. Starting today, we have one week to make an image that will be posted on our respective blogs next Monday. The parameters that we've laid out are: self portrait, at night, single flash, city in the background. Given that this is my idea of a self portrait, things could get interesting.


If any of you want to play along, post your images next Monday and drop a link in the comments.

Monday, June 15, 2009

Water droppin'

A few weeks back I read this post over at the Strobist blog about how to photograph water drops with a single flash. Now this is something I've often wanted to do, but thought I needed some complicated technology to make it happen. Turns out, no. I've had all the things I needed for a while now, but, as is often the case, I was over thinking it. Anyway, I saw this post and thought, "hey, that doesn't look too complicated. I'm gonna give that a try when I get a free weekend."

Turns out, I wasn't the only one with that thought. I checked my buddy Boybarian Dad's blog a few days later, and he posted this. Now the gauntlet's really been thrown. Gotta bring my "A" game.

Setup. After watching the walkthrough video at Strobist a lot couple times I got my gear together.

Canon 50D
100mm Macro lens (most any lens will do)
Tripod
Canon 430EX flash
AlienBee Cybersync flash triggers
Pyrex Casserole dish
Construction paper (assorted color/pattern)
French's Onion can
Bread bag

I put all this gear together around my dining room table because there was a lot of room to move around, and there was something to hang the bag of water from. In addition to trying out this technique, I also wanted to try out a cool piece of software I just got for my iPhone. Full confession, I'm an app-aholic when it comes to my iPhone. I downloaded this wicked camera remote control software from OnOne a few weeks back and I thought this was the perfect time to try it out. I'm nothing if not ambitious. Go here to check it out.

So I get the camera and tripod set up, camera connected to the laptop, flash triggers hooked up and water filled casserole dish in place. Hard part's over right? Wrong. I need something to hang over the dish and go drippy-drippy for me. No big, I thought. I'll just grab a Ziploc bag, put some water in it, and voila! beautiful drips. Do you know what happens when you fill a Ziploc bag with water and poke a hole in it? Drips? Nope. Nice, STRONG stream of water comes shooting out the hole. I had the good sense to test it with the hole pointing away from the somewhat expensive camera/computer gear arrayed around the dish. Ok, plan B. I needed something that wouldn't be under so much pressure when I put the water in it, so I thought about the bread bag that my wife had thrown away earlier in the day. Yes, I got this out of the trash, I'm serious about my art. After a bit of experimenting, I found that I could poke a hole in the side of the bag and let the water run down to the bottom and drip off. Worked like a charm.

Oh, you might be asking about the French's Onion can. Well, I needed something to rest my flash on, and the onion can was about the right height. And hey, who doesn't like French's Onions? Thanksgiving time, green bean casserole, crunchy onions piping hot out of the oven... Oh, picture taking, water, right, sorry. How 'bout a setup shot? Conveniently labeled for your question answering pleasure.

Photobucket


If you watch the walkthrough video at the Strobist blog you'll get a good idea of camera/flash settings. Let me say, focusing is critical, so make sure you pay close attention to that part.

After getting all set up, I could start playing. You're going to take a lot of shots. If the drops are slow enough, you can make some slightly "planned" shots, but this is essentially a spray and pray situation. After the first few shots, I reviewed them on the back of my camera to make sure they were in focus and that the drops were landing where I expected them. I then started firing away, adjusting the flash position occasionally and varying my white balance to get a variety of colors and tints.

After a few shots like this (ok, fifty) I decided to bring out the secret weapon. Ah hah! Didn't know I had a secret weapon, did ya! Here it is.

Photobucket


Yessir, having kids around can pay off big time for your photography. These little guys look like colored Alka Seltzer and they pack a lot of color in a little tablet. They are made to tint a bathtub full of water, so they were pretty potent in a container this size. They also dissolve pretty quickly, so you don't waste a lot of time/water drips waiting for the water to change color. I started with a yellow one and added a blue one after a while. These things really kicked up the color excitement meter quite a bit.

Alright, enough yakkin', here's the pics.

Photobucket

Photobucket

Photobucket

Photobucket

Photobucket


Just like that, in the comfort and safety of your own home, you too can play with water and have a record of it for all to see. If any of you have a go at this, email me so I can check out what you did! Almost forgot, the iPhone software was sa-weet. Zero setup, worked the first time.

Thursday, June 11, 2009

Downtown

Here are some of the images from my photowalk in Downtown L.A.

Photobucket

Photobucket

Photobucket

Photobucket

Photobucket

Photobucket

Photobucket

Photobucket

I really want to thank my buddy Jim for heading down there with me and helping to make this such a great time. Here he is finding yet another sweet angle at the Disney Concert Hall.

Photobucket

iPhone #2

I'm still working on my other images from my photowalk downtown, so I'll have those up in the next couple of days. In the meantime, here's my second iPhone picture. I shot, processed, and added the border all in the phone. I love me some technology.

Photobucket

Wednesday, June 10, 2009

Disney Concert Hall

I've been wanting to go down to the Disney Concert Hall for quite some time. Frank Gehry designed this building to be a world class venue for musical arts, but also as a piece of art in it's own right. Last week I decided the time had come, so I told a photographer friend of mine about the idea and we decided to head down together. I was not disappointed. Not only did we photograph the Concert Hall, but we ended up taking a walking tour of downtown L.A. In my almost 14 years of living here, I've never seen most of downtown, so this was a real eye-opener for me on many levels.

I'm going to split my little photowalk into two posts. This first post is just images of the Concert Hall. My next post will sort of be the catch-all, with all the other cool things I came across that day. Here ya go.

Photobucket


Photobucket


Photobucket


Photobucket


Photobucket


Photobucket


Photobucket


Photobucket


Photobucket


Photobucket

Wednesday, June 3, 2009

Same place, sprinkled

Went back to my new favorite park this morning and found all the plants and flowers had just been watered. I love the look of water drops on flowers. Please to enjoy.

Photobucket

Photobucket

Photobucket

Photobucket

Photobucket

Tuesday, June 2, 2009

Lunchtime walk

I had a great time walking around the neighborhood during my lunch break yesterday. So glad I had my trusty G9 with me.

Photobucket

Photobucket

Photobucket

Photobucket

Photobucket

Monday, June 1, 2009