


Firstly, let me say thanks to all those who left comments yesterday, it was much appreciated.
Ok, say you want to take a picture of yourself in a mirror (without looking like you're there) and/or be in two places at once. Here's how I did it. After the camera, the most important thing to have is a tripod. Without a tripod this would be extremely difficult, if not impossible. I decided to shoot this in my kid's bathroom (as opposed to my bathroom like the last time) because I loved the idea of two mirrors. I put my old Canon Rebel XT on a tripod at placed it between the mirrors, standing in the tub. I used my Tokina 12-24 lens to get the widest view I could. Your camera definitely needs to be in Manual for this. Focus, shutter speed, aperture and white balance need to be set and stay consistent for all the images.
I knew I was going to use some flash on this, so as I've learned over at Strobist, the first thing I did was decided how much of the ambient light to use. I didn't want the window to be blown out (overexposed) so, with the flash turned off, I came up with an exposure that kept the detail in the window. The actual numbers don't matter, as long as it works. Now that I had my ambient exposure set, all I had to do was dial in the power from my flash until the room was lit the way I wanted. I had the external flash on my camera pointed up to bounce off the cieling and setting of 1/4 power got me where I wanted to be.
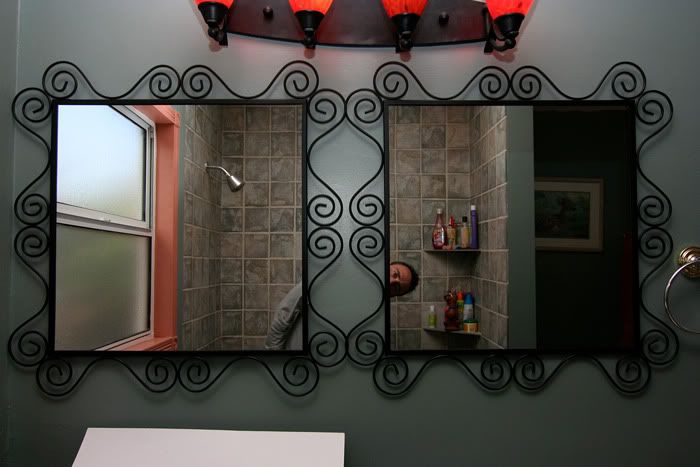
Ok, so I have my camera positioned where I want it, the light's looking good, now for the critical step. I take an base image (or plate) that's completely free of anything that's gonna move.
This is the image that I will build on when I bring everything together in Photoshop later. The white paper is a piece of poster board that I used as a reflector to bounce some light on my face when I was standing in front of the left mirror. I knew I would be cropping just below the mirrors later, so I wasn't worried about it being in the frame.
Time to take the fun pictures. I used the self timer set to 10 seconds to take all the images. With everything set up, it's really just a matter of experimenting. I took the image of me on the left first.
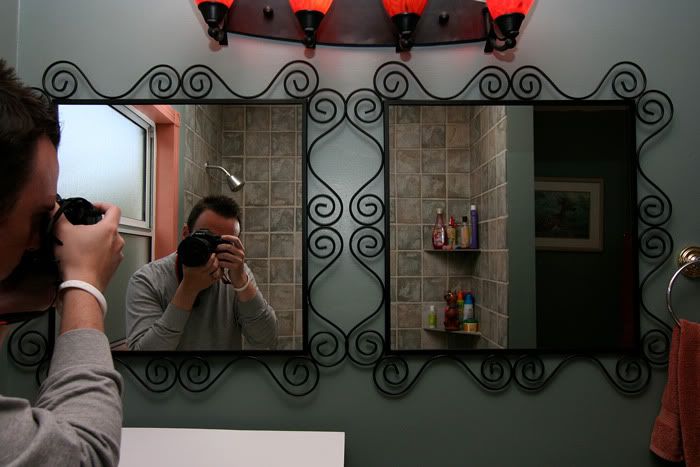
Oh, I didn't even have the 50D in my hand turned on, just trying to look cool. The critical thing about making this image work later is making sure my reflection and actual self don't overlap. If they overlapped I wouldn't be able to cleanly remove my actual self. That sounded strange. Anyway, moving on.
The image on the right was the result of a fair amount of experimentation. I tried standing in front of the mirror holding my camera, peeking up from below, having just my arm and camera in the mirror, but nothing seemed quite right. Finally I just poked my head out from behind the camera and took a shot. Bingo!
Now that I had what I needed (hopefully) I pulled the memory card out of the camera and left everything set up. This is important, because you might find you need something else later and it's crucial that the setup stays the same.
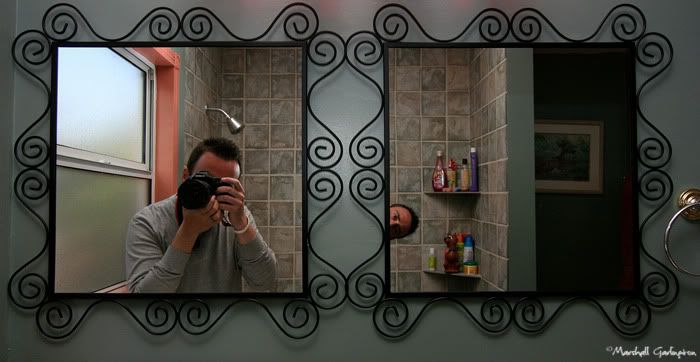
After importing all the images I picked the keepers and sent them to Photoshop. Starting with my base image I dragged the other images on top. If you hold down the Shift key while dragging one image on top of another, they will line up pixel for pixel. Since my setup stayed the same from shot to shot, they all line up perfectly. Next I add a black layer mask to the image of me on the left and my face on the right and reveal just the portions I want to see. Since I was careful about how I stood for each image, this is very easy.
After cropping I cloned out some of the shadows from the light fixture. The last step was to even the light out a bit. Since the flash was bouncing off the cieling, the light was a bit stronger on the top than the bottom. I evened this out by using a Graduated Neutral Density filter in the Nik Color Efex Pro plug in. Save For Web and add a touch of Smart Sharpen and I was done!
Edit: Hey, I just noticed that this is my 300th post! Yeah for me!
4 comments:
Standing and clapping!!! You da MAN!
(flash scares me. but I'll learn someday. I will! But, for now, my pocket book thanks me for being scared and not spending the $$)
Awesome, awesome composition. Thanks for sharing your intricate set-up and planning and PS secrets.
You knocked this one out of the ballpark. :-D
Way cool, bro. Thanks for the explanation. One day I will step up to the plate.
Dude, this is awesome. The composition and creativity are fab. I love this, very well explained.
You always have the best tutorials.
B Dad
Oh this is way too cool!I am seriously going to try this out. I love how your pictured turned out. Great job!
Post a Comment