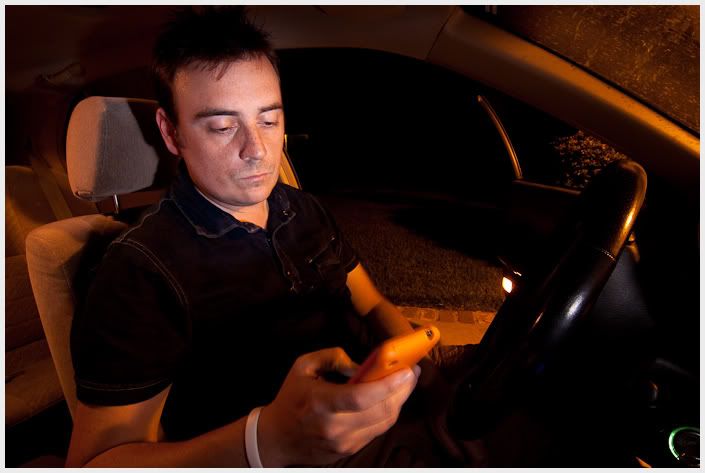
I thought that yesterday's Lighting and Portrait Challenge image could do with a bit of splainin'. I believe that any problem can be solved with the addition of more gear. Kidding! Although there was a bit more to making this image than it might seem at first. Once I decided that I wanted to do my self portrait in the car, I had to figure out how to get all my gear in there and secured. Turns out I never totally figured out the secure thing, but that's for later. I also needed a way to remotely trigger the camera since I would be driving and couldn't reach the shutter button.
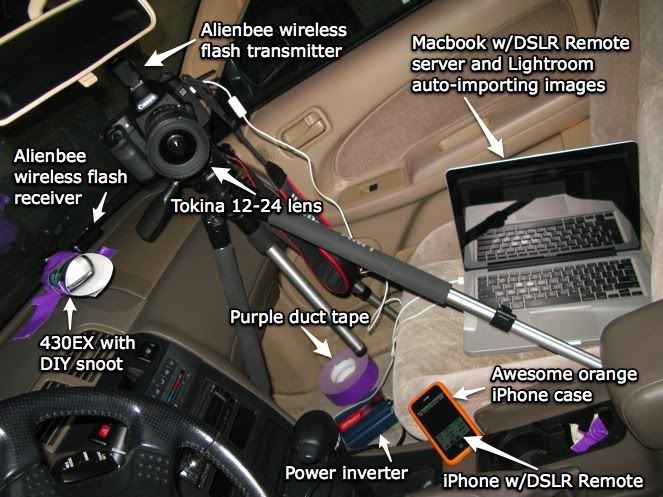
First, the tripod. No big deal really, just spread the legs around a bit to find the most stable position. I wasn't rock solid, but held up just fine. Next, the flash. I needed it to be on the dash in order to cover my face the way I wanted. No problem. A liberal application of duct tape should be sufficient right? You know the one thing I've found that duct tape won't stick to? The dashboard of my Maxima. Yep, once I got rolling, the first turn I made sent the flash shooting off the dash and into my lap. Of course seeing that the duct tape wasn't working, what do you think I tried next? You got it, more duct tape. I'm a slow learner. I did manage to get it to stick long enough to get the shot, but I'm still not exactly sure how.
Ok, now I need a remote trigger. Seems to me, I've been down this road before. The DSLR Remote software from onOne would be perfect. Oh wait, that needs a wifi network to work though, and I'm gonna be driving around. But wait! (WARNING: technical jargon ahead) I can create and Ad Hoc network on my laptop and connect my iPhone to that! This made it kinda like using bluetooth *cough, new feature would be nice, cough* and it worked like a charm. The only thing I really wished for was a larger button for firing the shutter so I didn't have to look down at the phone so much.
So I've gotta have my laptop in the car to run the DSLR remote server software so I might as well have the images auto-import into Lightroom right? I mean, what self respecting photographer wouldn't want that? I figured all this fancy computin' stuff's gonna run my battery down quick, so I dug around and found a power inverter that plugs into the cigarette lighter and powered my laptop.
Whew, that's a lotta stuff. Oh, almost forgot. I wanted the light coming from my flash to be fairly focused so I needed a way to shape it into a narrow beam. There are different ways of doing this, but I decided to use a snoot. A wha? A snoot is like a tube that you put on the head of your flash to concentrate the light. You can buy one of these, but I decided to go the DIY route and make my own. (Thanks old AppleTV box!) With a bit of cutting and folding, and the aforementioned duct tape, I had a snoot. This would be a great place for a picture of it, but I don't have one so we'll move on.
Once I got all this set up in the car, I needed to dial in my settings. I got the focus and framing set from behind the camera, and then did everything else from the drivers seat. I needed to get the flash position and power set first. Once I had the flash in position, I started taking pictures and adjusting the flash power until I had the light on my face that I was looking for. I ended up at 1/64 power on the flash and an Aperture of f/10 on the camera. At this point, it was just a matter of dialing down my shutter speed until I had as much on the ambient light as I wanted. In this case, 0.8 sec. It was so awesome to be able to do all the Aperture and Shutter adjustments from my phone with the onOne software. Saved me a lot of running around. This is what those settings looked like sitting in my driveway.

After that I just drove around and took shots when I thought there would be something cool passing by outside. Oh, another tip. If you're going to try something like this, make sure your flash is NOT set to go to sleep every couple of minutes. Um, yeah. Alright, here's the all important setup shot to give you an better idea of where everything was.

I hope this gives you a better sense of what went into this shoot and maybe sparked some ideas of your own. Until next time, keep shooting!


6 comments:
That is awesome...only thing to make it better would have been some story of how you got pulled over and had to do some splainin' too Mr. PoPo. ;`P
First I snickered over at Julie's blog, then I came over here and nearly snorted my coffee out my nose. Thanks ro both of you for making my morning coffee extra specially fun today. And thanks for the extravagant description of what lengths you go to to get that awesome (seemingly simple to those not in "the know") shot.
From one who's spare with words to another ... I 'preciate it!
Thanks for the comments! llaxton, good to see you.
Your post is fantastic...
Seeing photographers shooting self portraits is always a treat.
Thanks for sharing your clicks with us!
I just always love your setup pics. I think that was my problem I didn't use a snoot. :)
B Dad
Post a Comment