


Panoramas, one of my favorite kinds of images. Once you have some success making panos, you're gonna find reasons to shoot them all the time. Before you think about shooting techniques and settings though, you must have one essential item. Stitching software. If you have Photoshop CS3 or newer, you're set. This isn't to say that panoramas can't be done in earlier versions of Photoshop, but if you try it you're gonna write me hateful emails. It is so cumbersome and the results so disappointing that you'd be better off printing out the images and slappin' them together with scotch tape. Do I sound bitter? The next best option is Photoshop Elements. To the best of my understanding, the tools for making panoramas in Elements are the same as in Photoshop so you'd be set. The third option is a standalone piece of software. The one I've used in the past is called Autopano Pro. This is what I used before CS3 , and it does an awesome job of stitching the images together. In my opinion, the newer versions of Photoshop do an equally good job and have the added benefit of being more full featured software, but I wanted to give a standalone option.
Ok, by now most of you are saying "Yeah, yeah software, blah blah blah, get on with it". Alright, grab ahold of the one you love, we're going in. Your life will be so much easier and your results much more consistent if you're shooting with a camera that lets you choose all the settings manually. Many point and shoot cameras these days will let you do this, and certainly any digital SLR will. The key to making a nice, smooth panorama is consistency between your shots.
So, you've climbed that mountain, or fought those raging rivers (or driven down the street) and your ready to capture that grand vista before you. "What your lens isn't wide enough to capture the whole view? Never fear, Captain Panorama is here!" Ok, that's lame but there you are. Now unless it's going to be a long exposure or some other special situation, I always shoot handheld. (i.e. without a tripod) There are technical reasons why you would want to shoot with a tripod sometimes, but most of my shootin' ain't technical. The first thing I always check is white balance. I know, right "white balance?". If you want to be sure that all your images with have a consistent color or white balance you need to pick one and and leave it there. Auto White Balance is not your friend here. For most of my outdoor shooting I set mine to "Sunny" and just leave it. If the day's overcast you might set it to "Cloudy", but the key is to have them all be the same.
Next is exposure. Exposure consist of three things: aperture, shutter speed, and iso. If you're shooting on a fairly sunny day, probably your lowest iso is the best. For DSLR's it's slightly less critical, but for point and shoot cameras the quality is going to be much higher if you keep the iso at a low number (say below 200). Iso set, next is aperture. There's a lot that goes into choosing an aperture for a given scene, but seeing as how you're shooting a panorama, you probably want most of the scene to be in focus. This is as opposed to a shallow depth of field where only a small slice is in focus. I'd say start around f/8 and adjust to taste. This leaves shutter speed. With your other two settings fixed, find the brightest part that will be in your panorama and set your shutter speed so you have a nice exposure. Take a few test shots and see if you're too bright or too dark. With those set, you're ready to start shooting.
ALWAYS shoot from left to right. Every program for stitching panoramas is going to expect your images to be in sequence from left to right. Trust me, going back and renumbering all your shots so there in that sequence is a pain in the butt. Save yourself the trouble and shoot from left to right. You'll want to leave a bit of room above and below whatever is most interesting in your image to account for slight variations in the images. Don't shoot as tight as you might normally. You will be cropping later, so give yourself some leeway. Oh, I almost forgot, before you start shooting, set your focus where you want it and don't change it. If you're on a DSLR, set the focus then switch the lens to manual focus. If you don't have a manual focus setting, try to focus at the same distance for each shot. I know this sounds like a lot, but once you get in the habit, it's no big.
So you take your shots (from left to right), leaving a little extra room above and below your main subject and a bit on either side for good measure. Try to overlap the images by about 30% to give the software a good chance of lining them up. I find it helpful to take a shot of my hand after shooting a panorama so it's easier to find the shots that go together later. For your first few panos, I'd say don't take more than 4 or 5 images.
Hard part's over! If you have Photoshop or Photoshop Elements, fire them up and grab all the images for single panorama. Go to File -> Automate -> Photomerge. Under Layout the setting that seems to always work best is Cylindrical. Doesn't make a whole lotta sense to me, but da pictures don't lie. Click "Add Open Files" the hit "Ok" and Photoshop will do the magic. When it's done you'll see that are some ragged edges that need to be cropped off, then you can do your normal image processing (levels, saturation, etc.).
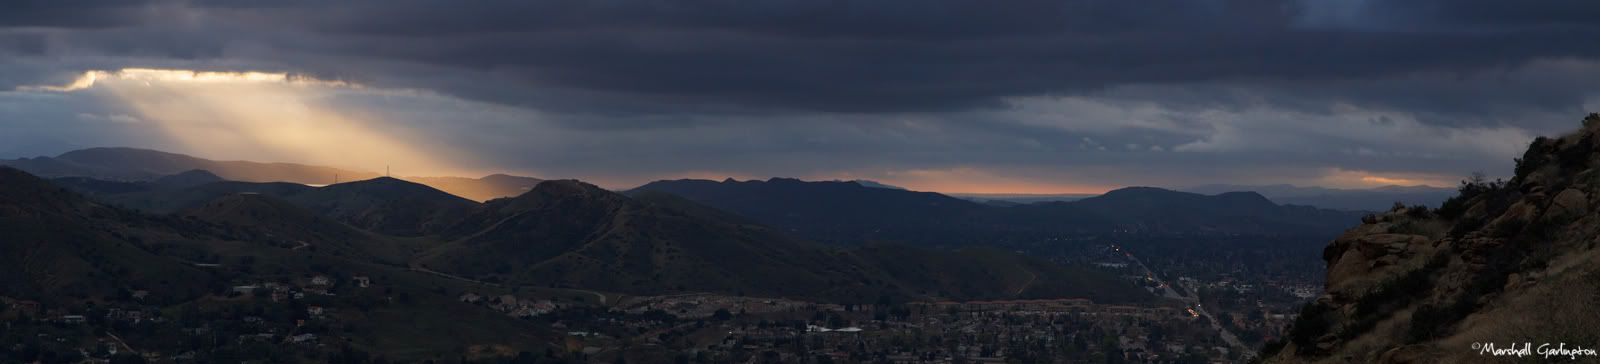
That's it! You did it! See, not so bad right. Right? Hello? Well, for all of you that are still here I thought I'd throw in a panorama that I shot today. Here it is. And as always, click here for the larger version.

10 comments:
Excellent post. Thanks for running through your process for making a pano. I have been needing another excuse to purchase some editing software, and I think you have just given that to me.
First of all dude, hat's off to you, that was an awesome post, seriously, nicely done. Your tutorial is alot like some of Scott Kelby's books, it was like I was right there with you shooting a pano and you were giving me your advice, not too technical but just what a guy needs to know and pretty hilarious :).
Well this will get interesting for me, I have CS2, my bride has CS3 with her mac, but she doesn't let me get within 3 feet of that machine :). Maybe I'll wait until she's sleeping or just brave it in CS2, or heck I do have some extra scotch tape laying around :).
Since I'm going to try it your way, no tripod. How do I keep myself from keeping the camera close to level and inline as I turn?
I'm excited to try this and I might be in luck. Tommorow we are suppose to get a snow storm of up to 1 foot of snow, it could make for some fantastic panos.
When is your book coming out?
B Dad
Thanks for a super post. I've printed it and intend to try.
Marshall... WHY couldn't you have done this post BEFORE I went to the Grand Canyon!??!?!?
I bookmarked it. So many awesome tips in here. Can't wait to try it out...
I like the photoshop stitch tool a lot. I kick it off from Adobe Bridge after selecting the photos I want.
This shot contains about 17 vertical shots with a 70-200mm
http://www.flickr.com/photos/loganboyd/2858271380/
Thanks everyone. BDad it just takes practice to keep the camera level. Skeller, I knew it was gonna be cloudy. ;)
Great explanation! Now, I need that new puter to make it all come together.
I ran across you on Boybarian's blog and Susan Keller's blog...so glad I did because I was able to apply your techniques to a panoramic of a military formation here at Fort Hood. Perfect application! Thanks so much!
Julie, so glad that this helped you out. I'd love to see the result of your hard work.
Okay, I posted my panorama...not the most artistically beautiful picture, but it was SO easy! Thanks again.
Post a Comment