


Ok, this post is gonna be part tutorial, part motivational speech. I want to explain how I shot a long exposure star trail image, but I also want to use it as an example of the broader idea of pushing yourself and not waiting until things are "just right" to try something. Let's get to it.
I went to visit my family in Louisiana last week. My 96 year old grandmother was/is in the hospital with a broken hip, and while things seem fine now, you just never know what could happen when someone gets up in age. I wanted to make sure I could see her. She's very special. I know that's a bit heavy, but I wanted to say why I was there and hey, it's my blog.
Let's start by defining what a star trial image is. Star trails are streaks that form when you have a long exposure and the rotation of the earth makes the stars appear to move through or rotate around the image. Didn't know there was gonna be some planetary science in here, did ya? Basically, your camera's on the earth, and the earth's spinning. Leave the shutter open long enough, and things seem to move. I tried this last year when I was up in Yosemite.
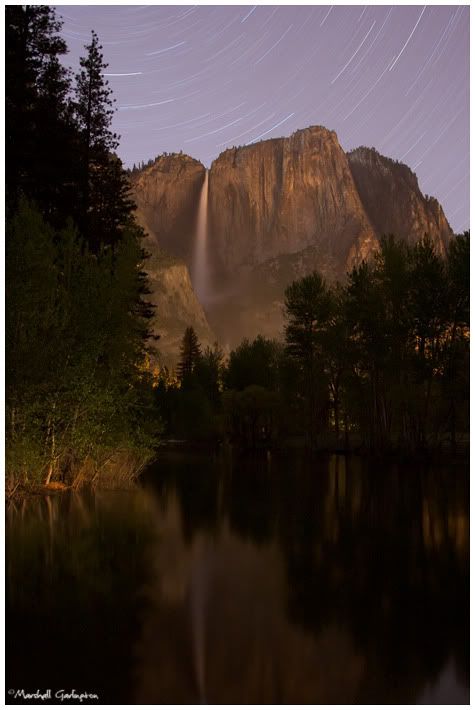
This was a single, one hour exposure. This also happened to be the first time I had ever tried a shot like this. I was so happy with this one, that the next night I went out to try again. I'd show you that one, but you could basically get the same effect if you closed your eyes. Nothin'. I had everything set exactly the same as the night before, but I forgot one little detail; make sure to press the shutter button. Yep, waited around in the dark for an hour only to find that the camera had just been sitting there, waiting for me to fire it. Sigh.
What equipment are you going to need for this type of shot?
- Camera with manual settings. This is probably going to have to be some type of DSLR. My Canon G9 has manual settings, but it won't let me take exposures longer than 30 seconds. With this technique your exposure is going to be more in the 45 minute to one hour range.
- A moderately wide angle lens. Since this effect is best apprecaited if you can see a lot of the sky, a lens with a focal length of 35mm or wider is best.
- A tripod. A rock solid platform for your camera is essential. Any camera movement during the exposure will cause your star trails to be jagged or incosistent. Not the look we're going for here.
- A remote shutter release or some other means of keeping the shutter open for the exposure.
- Anti-boredom equipment. This is a long time to sit around watching your camera on a tripod, so bring something to occupy your time. Maybe music to listen to, or a book to read in your car. Or if you're like me in Yosemite, a remote flash to set up in bathroom stalls and take "surreal" images with your point and shoot. And by "surreal", I mean images that I would look at later and wonder what I was thinking when I took them.
Fast forward to last weekend. My parents house, where I did most of my growing up, is located in a very, shall we say, rural area. It's not the middle of nowhere, but you can see it from the hill behind their house. I hadn't really thought about doing any star trail images until it got dark at their house and I realized that it was a new moon. New moon, meaning the moon was not out, not the book from the Twilight lady.
I'm at my parents house. It's DARK. I've got my big camera, but no tripod. My dad walks into the house and magically reappears with a tripod, so I got that covered. The only thing I'm lacking now is some type of remote cable to hold the shutter open for the 45 minutes to an hour that I need. I had purchased just such a cable for my old camera, but Canon, in it's infinite wisdom, did not make that cable compatible will all of its' cameras. What to do? Improvise! I needed something to act like my finger pressing the shutter button down for about an hour. What's around the house? A rubber band would work as tension. Now I just needed something to press against the button. My mom scrounged around and found a pencil eraser. The size was perfect and the rubber band could pull on it with sufficient force.
Did I say it was hot? And humid? It's about 10:30 p.m., mid 80's and 200% humidity. Kinda like wearing a warm, wet blanket when you're outside. This will be important later. I got outside and found a likely spot in their yard. I wanted to include some trees in the foreground just to give it some depth. Tripod set, camera on manual, shutter set to Bulb, aperture is f/4, iso 200, focus set to Infinity (no, really) in manual. You don't need to worry about depth of field for this setup, so f/4 is fine. All you're worried about being in focus here are the stars, and at umpteen light years away, you're good.
Time to set my highly sophisticated shutter release. I tripped the shutter three times while I was trying to get it set, but on the fourth one it stayed down. I stayed for a couple of minutes to make sure it was holding, then went back inside to wait. I came out an hour later to find that my eraser had given it's all in the name of photography and had been shot off the camera, never to found again. Remember the humidity? That plus the slickness of my shutter button had been too much for the slippery eraser. I check the lcd on the back of the camera and found that I gotten roughly five minutes of very shaky star trails. I must have been bumping it around too much when I was trying to get the eraser set, and that accounted for the shakiness. Three lifetime attempts at star trails and only one success. It's a good thing that first one went so well!
The next night I decided to step things up a bit with a new rubber band (ok, my first one broke) and a watch battery! The battery was my dad's idea, and it turned out to be perfect. Same settings, new place in the yard, 45 minutes.
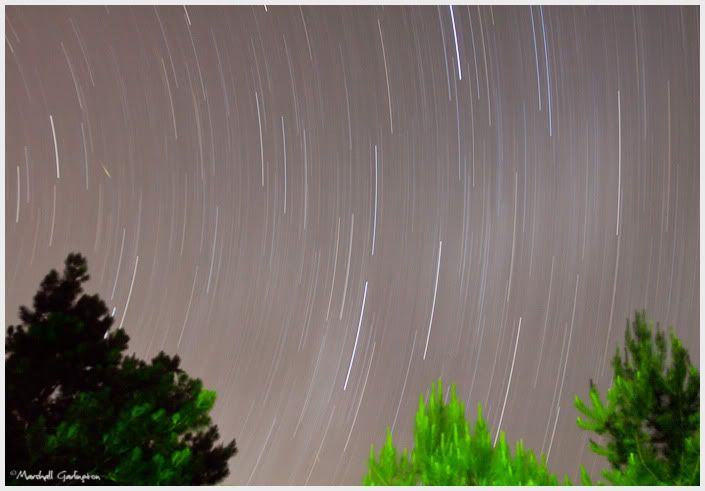
Not the most spectacular image, but the effect is what I hoped for. Of course, all this does is make me want to try another one! The first thing I want to show is that, if you want to try a technique like this, you don't need a lot of fancy gear. Most of you probably have DSLR's already, so what you need is a dark night with a clear view of the sky, and some type of remote release. And, as I've shown here, that can be almost anything.
The second, and most important thing I want to emphasize is, get out there and try something new. Maybe the first time won't be great, or maybe it will. If it's not great, you'll learn a lot. If it is great, you'll be stoked to try it again or push it further. Whether you want to try star trails, off camera flash, macro, portraits, high key, low key, combos of these, whatever. Try it. I've done tutorials on panoramas, water drops, taking a self portrait, post processing here and here, and all of my Fix-It Friday posts link to a small Photoshop/Lightroom tutorial. You can try one of these or find others on the web. The point is, step outside of your comfort zone and shoot something you haven't shot before. Learn something you didn't know about Photoshop. All it's gonna cost you is time, and the more you invest in your photography, the better your images will get.
Thus endeth the lesson.
7 comments:
Wow!!! As always, fantastic photos and a great commentary/tutorial.
I am now motivated for the day!! Great post. :-)
You, my friend, are awesome and an inspiration to boot. Thanks for sharing.
This is great, I'm going to get out there and give it a try.
You always have the best tutorials.
B Dad
Thanks all! I hope this is a motivation for some!
Yea it's so much motivation I had to come back and check out your post again :)
Thanks man.
B Dad
Wowzers!! The Yosemite star trail is Awe-MAZ-ing!
I wanted to try star trails last year when we were supposed to camp at Joshua Tree. A nasty headache put the kabbosh on that, but I hope to try again sometime. Especially now that I know I can jimmy-rig an eraser and rubberband into a "remote" of sorts. Thanks for sharing your ingenuity!!
Post a Comment