


So my wife's a big Buffy the Vampire Slayer fan. Truth be told, I'm a bit of a fan myself. The show's been off the air for a while, but occasionally some cool products or collectibles come out that need buyin'. Enter Jones Soda. They came out with this sweet line of Buffy themed sodas and my wife ordered up a set. But this is a photography blog, you say. The tie in's coming. Sooooooooo, the sodas show up and they're lookin' all cool, so my wife suggests that I take some pictures of them in all their coolness. Can do.
Is making highly reflective glass bottles filled with colored soda look good a simple task? It ain't brain surgery, but it's not plop-your-camera-down-and-shoot easy either. You're gonna need some stuff. Let's go to the setup shot.

Ok, so we need a camera on a tripod. Why? Because you need repeatability and consistency. This isn't going to happen if you're hand holding your camera. Second, we need light. For the main light, bigger is better. This umbrella is the biggest I have, so I went with it. If you have a big softbox, even better. A long, narrow soft box is best, but your main concern is just broadening out the light. You could do this with just one flash but it wouldn't bring the awesome.
Almost forgot, clean your products thoroughly before shooting! Nothing worse then loading your shots up on your big computer monitor later and seeing all that dust and all those fingerprints. I used a cloth that came with my iPhone. You are not gonna clone that stuff out later. Trust me.
The next things are kinda to taste, but can really elevate your shot. Something reflective to set your bottle (or other product) on. Black acrylic is great, but I didn't have that, so I improvised. My wife has this clear acrylic piece used for holding paint while you're painting. Preferably with a beret. The poster board in back is there to bounce the rear flash off of and give that high key look. The board on the left is there to bounce some of the light from the umbrella onto the shadow side of the bottle.
Ok, after taking some test shots (which were all awesome but I won't show you) and finding out the settings for my flashes, this is what I got.
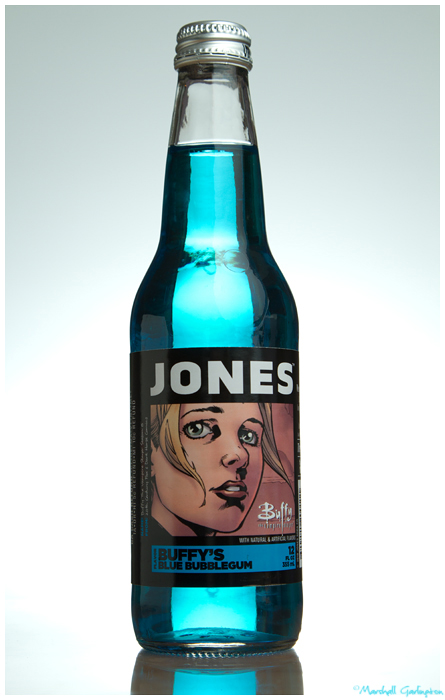
Blammo! Not bad, eh? Except for a little sharpening, this is straight out of the camera. The rear flash is backlighting all that great color in the bottle and providing a seamless transition from the acrylic to the background. Another key to this is setting your camera up to shoot almost completely level with the acrylic, similar to the effect of an infinity edge pool. I also aimed the flash so the light tapers off towards the top and gives a sort of natural vignette. How did I trigger the flashes? The Canon 7D has a built in flash commander. Aw yeah.
One thing I didn't show in the setup shot was a circular diffuser. For some of the shots I held it in front of the umbrella to further spread the light and get rid of the tell tale ribs of the umbrella. That knocks the amount of light hitting the bottle down a bit, but I liked the slightly darker look. The label, however was too dark. What to do? Why remove the diffuser and shoot another. You can then combine the two in Photoshop. Oh, didn't know there was post processing? It ain't easy lookin' easy.
So I shot two images for each bottle then brought them all into Photoshop. After putting the shiny labels on each one, I brought them all together in one image. I then (painfully) masked each bottle out, and put them on a background that I made to look like the original. Et, voila!
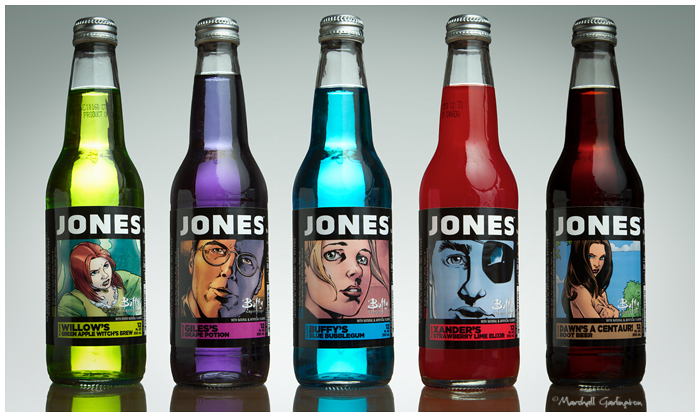
To really be the teacher's pet I should've rotated the bottles so the manufacturing date stamp didn't show. Alas, lesson learned for next time.
For all the tech geeks out there, I used a Canon 24-105L lens at about 35mm, f/8, iso 160. The main flash was at 1/1 and the rear flash was 1/16, zoomed to 105mm.
No comments:
Post a Comment